It’s time for an update on the Christmas Stocking I am stitching for my son. I had discovered a pretty significant error when I started the second set of “windows” and started looking ahead to the toe part of the stocking.
That looks pretty good, right? Well… when I started this project, I wanted to start in the top left hand corner instead of the center. I like to go from left to right, top to bottom and lots of the color was the same in the beginning – to me it just made sense. I counted, recounted, counted again. Did some math. Counted, recounted and did more math and was pretty certain everything was good to go. Then I started the stitching. Those of you who have been part of this SAL know this has been a very long term project for me. I am not a quick stitcher, I am quite slow. That does not bother me – I love stitching. This project has gone on timeout and come out of timeout more times than I can count. I have stitched and un-stitched.
Well… this error is not something I can unstitch without scrapping the whole stocking and starting over. The toe of the stocking is on the left of the stitching. In other words, I am too close to the edge of the fabric on the left – WAY too close, 3 inches too close in fact.
Once I realized that, my stomach sank and I sat there looking at the stitching for awhile (probably longer than I want to admit) and then had a really, really good cry. Then I set it on the table (not back in the bag where I keep it to be safe) and walked away. I went out to garden, took a shower and made dinner. All with that piece of stitching on the table. My kids and husband knew something was wrong. My youngest son (15), kept coming up to me and giving me a hug telling me that it would be ok and I would figure it out.
I left that stitching out all night on the table which is unheard of. We have three cats and a dog. I did not sleep well at all. Then, I did have an idea. Because I started close to the left hand side, I had quite a bit of “empty” fabric on the right side. I decided to try something out (something I still don’t know if it will work right). I measured, counted, did some math (we all know how that works for me).
And cut my fabric at the top right of the project. A big enough piece to overlap on the left with enough to stitch the toe and have a margin.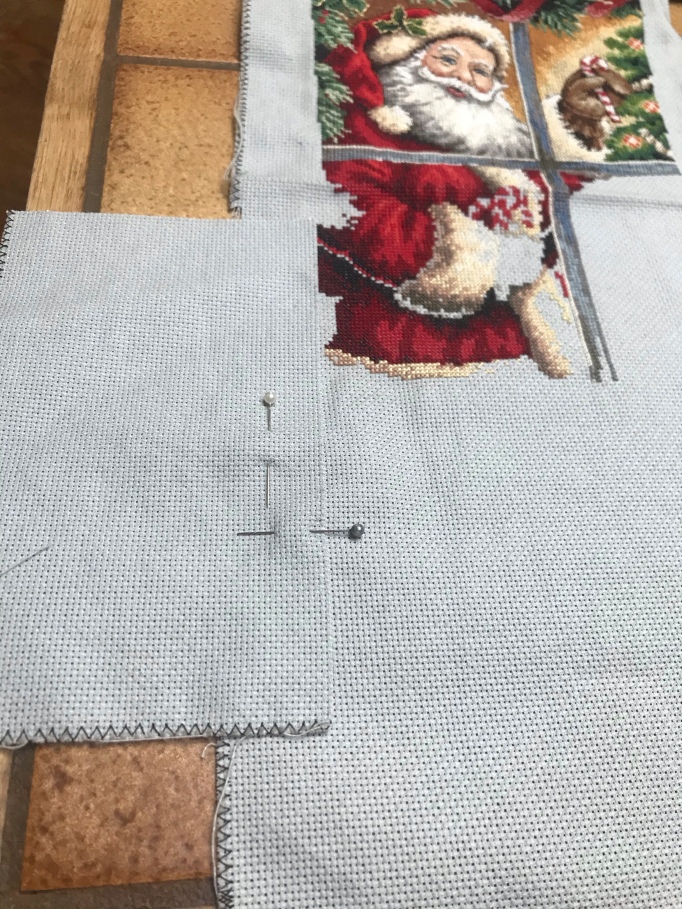
Then I pinned it to the right section. Pinning was not enough so…
I added basting stitches to hold everything in place all lined up. That looks pretty easy, but it was really a bear and took HOURS. Originally, the holes didn’t want to match so when I put the needle down from the top, I had to flip the fabric and make sure the needle went into the correct hole on the bottom. And then I had to repeat the process again from back to front. All in all, it seems to be working ok now.
Stitching on the double piece is still a little fiddly. Even though it’s all lined up and held together with those basting stitches, I still have to flip and check to make sure I’m on target for almost every stitch. It’s really SLOW going. I am hopeful that this “patch” will work and wont’ look too wonky when it’s complete. Only time will tell.
There are lots of more talented and creative stitchers who are a part of this group. Please take a look at their projects if you get a chance:
Avis, Claire, Gun, Carole, Sue, Constanze, Christina, Kathy, Margaret, Cindy, Heidi, Jackie, Sunny, Hayley, Megan, Deborah, Mary Margaret, Renee, Carmela, Sharon, Daisy, Anne, Connie, AJ, Jenny, Laura, Cathie, Linda, Helen

I have actually done something similar in the past. I cut out some extra AIDA cloth and kept on going. It worked. Yes it is fiddly, but I think that is a great solution.
Thank you Cathie!! I’m so glad to hear how this worked for someone else. I was feeling a little crazy for even trying.
What a magnificent save Connie!!! Well done!
Thank you Kathy! The newly stitched part on two layers is not all that different. I’m waiting for a bit more to see how raised it is going to be from the rest of the stitching.
Fab idea and I’m sure it will be perfect once the stitching has covered it, your heart must have sunk when you spotted the problem but I would say it’s a great save. xx
Great fix, and it looks like it will work. Santa is beautiful!
oh Connie . . . I can totally understand how you must have felt but wow, what a brilliant idea to solve the problem!
Absolutely brilliant! It may be slow going but so worth the save 🙂
Oh, Connie! I was reading your post and feeling so sad — but your solution is marvelous and you’ll have a great story added to this heirloom piece. Well done!
I think that is going to work fine!
My goodness, putting that patch on is certainly a fiddly job. A non cross stitcher like me wouldn’t have considered that the wholes have to match back and front, but of course they do. Your son was right! You did indeed work something out to fix the problem, great job!
Oh my, my heart dropped for you, I think it’s going to turn out just fine!
Oh, I feel your pain! And I’m so glad you came up with a work-around. My first thought was to piece more of your ground cloth where it was needed but because I’m a patchworker primarily I would have seamed it with a sewing machine – which I’m sure would not have worked out nearly as well! Here’s to happier stitching in the next three weeks!
Well, you solved the problem and that´s great! Even if it´s gonna take a bit longer to finish now you can actually do that! Great idea!!!!
Good save! It must have been heartbreaking, but it looks like it will be an invisible splice, and once it has presents in it, it will be perfect in the eyes of Tyler, so that’s what counts!!
Looks like you figured out how to salvage your Santa! Even though you will have to check a lot of things to make it work, bet you will finish it and no one will know the difference! Great job!
Oh Connie! I exclaimed out loud as I read through this, but so glad you found a solution! I too was thinking layering aida to the left. I think it’s good that your extra piece is on the bottom and the basting stitches will keep it all lined up! It should help offer a seamless looking finish ❤
Well, well done to you for sorting it out! Very resourceful. I have had a similar experience, with one of those great big Christmas angel pictures, (do you remember those? Absolutely stunning! Unfortunately, I decided to go off down one side, and somewhere I missed a big chunk out, so when I started to join it up, it won’t fit. My eyes have now deteriorated, so I can,’t see to sew on evenweave. My friend took it to finish, but think she is stumped too, as there has been no mention of it for about three years, and I don’t like to ask. It may never see the light of day, I think!I am glad you have found a solution, it will be a big feeling of satisfaction when you put that last stitch in! Over this weird time, I finished a big celtic cross stitch which I started in 2004. That was a great feeling! xxxx